You can connect to an existing desktop session on your linux workstation with Xpra
Prerequisites
You will need Xpra installed on both the local workstation you are using (the client) and the remote Linux workstation you wish to access (the server). As the registered workstation user of the latter (the remote Linux workstation server), you should do the following.
sudo apt-get install xpra
For a local Linux client, the command above (or an equivalent) should be run (by you or by local system administrators).
For local Windows or MacOS clients choose the correct Xpra client package from here e.g. windows/Xpra-Client-x86_64_Setup.exe or MacOS/Xpra.dmg. In addition to installing Xpra you will need X11 server and terminal software. On Windows MobaXterm includes both X11 server and terminal functionality, on MacOS use XQuartz or an equivalent.
Linux step-by-step
Perhaps the simplest test of Xpra is to open an X-terminal on the remote server and display this on your local client. You can test this first at the console of the workstation you wish to access remotely with the following command.
xpra start --start=xterm
This will start an Xpra server and open an xterm window on the local machine. To detach from the xterm, use <Control-C> in the window in which the command above was typed. The command xpra list will list the Xpra servers running and their display numbers.
For the following you will need to substitute CRSID for your own CRSID. You will also need to substitiute myworkmachine.ch.private.cam.ac.uk for the fully qualified hostname of the remote workstation. You can obtain this by typing "hostname -f" in a terminal window on the remote machine.
For a local Linux machine you can start a remote Xpra server and connect to it in one step. Enter the following command.
xpra start ssh:CRSID@myworkmachine.ch.private.cam.ac.uk:100 --start=xterm
You will be prompted for your password on myworkmachine.
Enter commands in the xterm which has opened. Any new windows launched by those commands will open on your local display.
Further examples of Xpra usage can be found on the Xpra wiki pages.
Remote connection through a bastion host
If you regularly access particular machines by SSH (remote1, remote2, etc.) place the following lines in your SSH config file (~/.ssh/config) on the local Linux machine from which you connect. Repeat the lines (edited appropriately) for each remote machine to which you connect. This configuration tells ssh when connecting to 'remote1' to first open an ssh connection to barbican.ch.cam.ac.uk and route the connection to myworkmachine over the connection to barbican.
Host remote1
    User CRSID
    Hostname myworkmachine.ch.private.cam.ac.uk
    ProxyCommand ssh CRSID@barbican.ch.cam.ac.uk -W myworkmachine.ch.private.cam.ac.uk:%p
If the lines above are added to your local ~/.ssh/config, starting the X-terminal simplifies to
xpra start ssh:CRSID@remote1:100 --start=xterm
To avoid repeating your password at each step, generate your ssh key on the local machine (ssh-keygen) then copy it to barbican (ssh-copy-id CRSID@barbican.ch.cam.ac.uk) and to the remote workstation (ssh-copy-id CRSID@myworkmachine.ch.private.cam.ac.uk). This process is explained here.
You might wish to start an X-terminal on the remote Linux server machine:
xpra start ssh:remote1:100 --start-child=xterm &
then detach from it:
xpra detach ssh/remote1:100 &
and reattach it later:
xpra attach ssh/remote1:100 &
If you have problems with forwarding the connection via the bastion host it can be worth switching xpra's underlying ssh program to OpenSSH
xpra --ssh="ssh -x" start ssh:CRSID@remote1:100 --start=xterm
as the default (paramiko) doesn't always understand everything we put in the ~/.ssh/config file
Windows step-by-step
Make sure you have started xpra on the remote Linux machine first with
xpra start --start=xterm
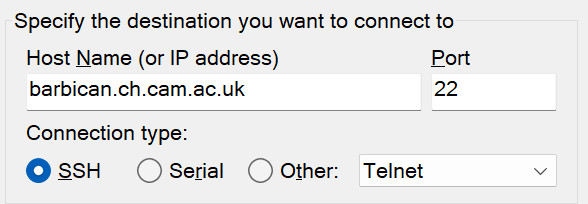
In the Windows program PuTTY, make a connection from your local Windows machine to barbican.ch.cam.ac.uk in the top of the PuTTY Session screen.
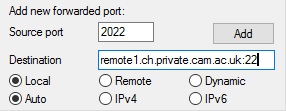
In the Connection - Data screen set your username (on barbican) to avoid having to enter it. In the Connection - SSH - Tunnels screen add a new forwarded port, for example
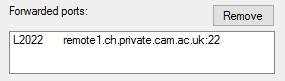
Click Add then the following line will appear in the white box above the fields you completed.
You may save the configuration settings of this connection in the Session screen (the first one you edited).
Click the Open button to connect to barbican from this Putty session. A window will appear in which to enter your username (if required) and password. Keep this connection to barbican open all the while you need the tunnel open from your local Windows machine to the remote workstation.
Start the Windows Xpra client with C:\Program Files (x86)\Xpra\Xpra-Launcher.exe or by clicking the Xpra screen icon. In the pop-up window choose Mode: SSH, enter your username @ localhost, then enter the number of the local port you forwarded in the PuTTY configuration (e.g. 2022) and the DISPLAY number you wish to connect to on the remote Xpra server (e.g. 100). Click the Connect button and the X-terminal window started on the remote Linux workstation should appear on your Windows desktop.
You may wish to save these setting to a file 'name.xpra' (only files with the .xpra suffix are displayed by [Load]). Connection with Xpra can also be accomplished in a Windows command window with:
"C:\Program Files (x86)\Xpra\xpra_cmd.exe" attach ssh/username@localhost:2022/100
To avoid entering your passwords for barbican and the remote workstation follow steps to generate private & public ssh keys for use with Putty & Xpra. Tell PuTTY where to find your Private key file with the Browse... button in the Connection - SSH - Auth screen.
MacOS step-by-step
Once the Xpra client has been added to Applications, open it. The launcher pop-up is basically the same as for starting the Windows client described above.
Further information
Many other options are available. Please see the Xpra Getting Started, manual pages ('man xpra') on your local workstation or on the internet man pages.
